
On your Synology NAS
- Make sure DSM is properly configured for Time Machine backups.
- Make sure your NAS has enough free space.
- Make sure the following options are selected at Control Panel > File Services > SMB > Advanced Settings > General:
- Maximum SMB protocol: SMB3
- Enable Opportunistic Locking
- Open Terminal:
- Go to Finder and navigate to Applications. Open the Utilities folder and click on Terminal to open it.
Alternatively, you can use Spotlight Search by pressing Cmd + Space, typing “Terminal,” and hitting Enter.
- Enable SMB2 lease
- Enable SMB durable handles (Cross-protocol file locking will be disabled)
TerminalLoading... - Make sure the following options are selected or set at Control Panel > File Services > Advanced > Bonjour:
- Enable Bonjour service discovery to locate Synology NAS
- Enable Bonjour Time Machine broadcast via SMB
- Set Time Machine Folders
- Turn off the recycle bin for the Time Machine folder.
- Try creating a new shared folder and setting it as the Time Machine backup folder.
- If it isn’t already, move the Time Machine backup folder to an ext4 or Btrfs volume.
On your Mac
- Make sure your Mac is properly configured for Time Machine backups. You may need to remove your current Time Machine backup disk and set up your Mac again with the correct configurations.
- Make sure your Mac has enough free space.
- Make sure your Mac and NAS are on the same local area network (LAN). If you can’t connect to your NAS, try connecting via these methods.
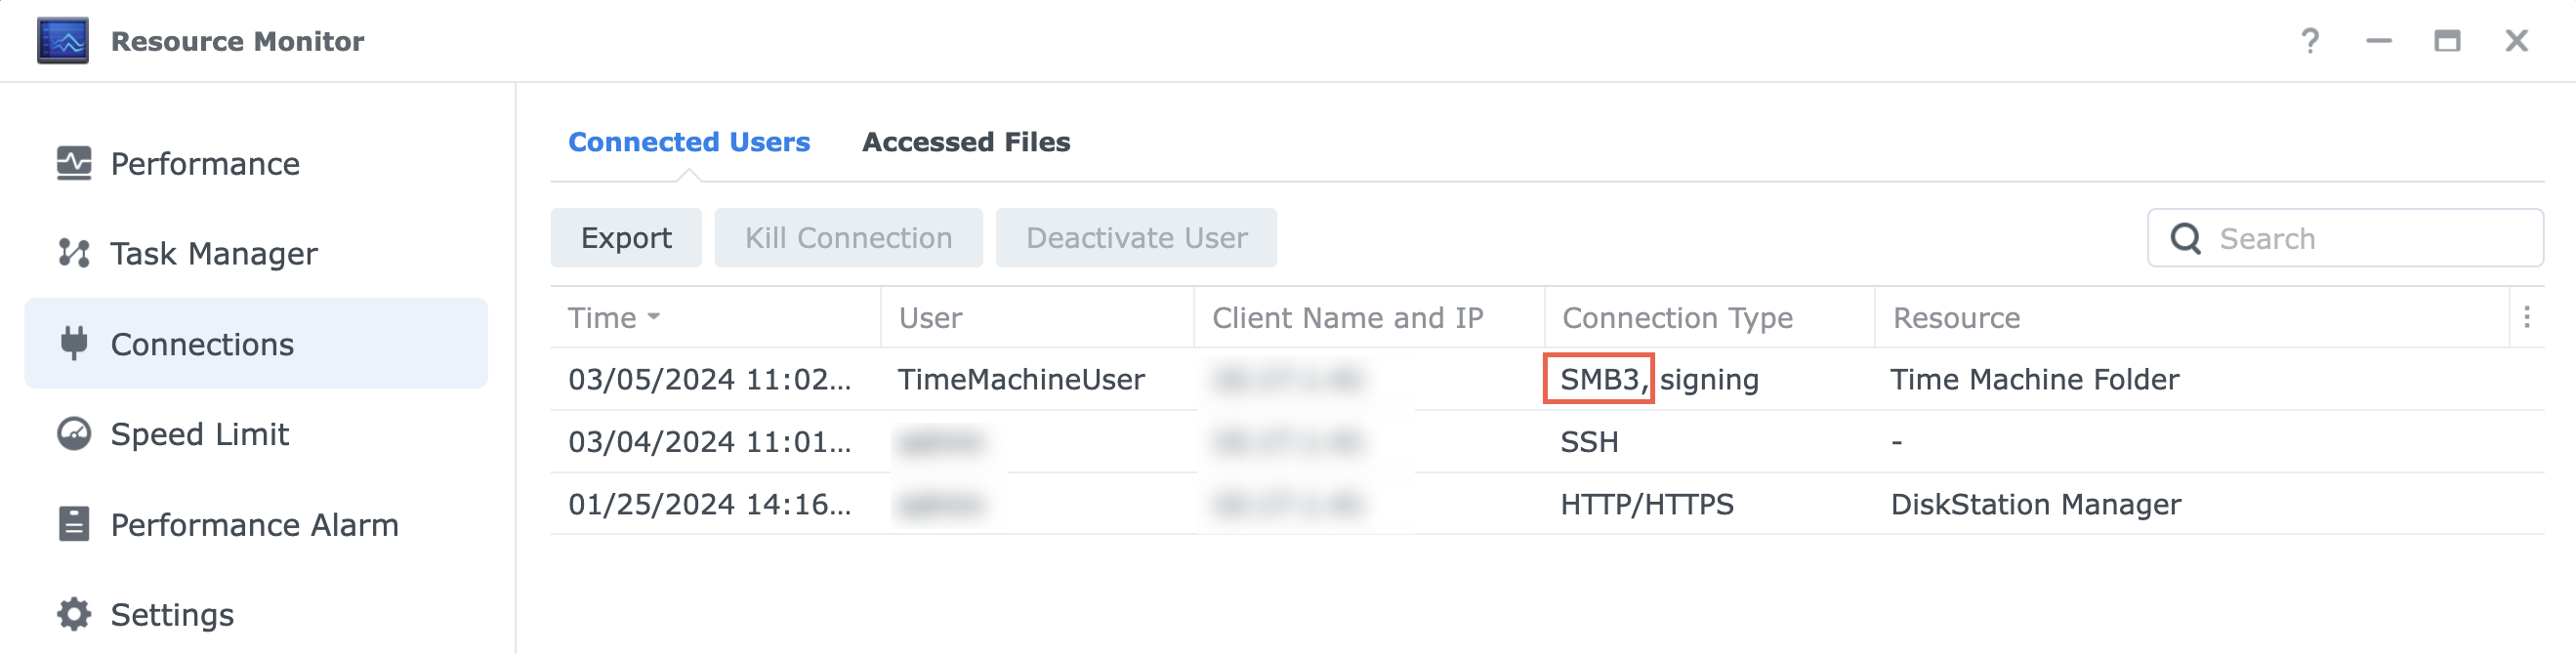
- Make sure your Mac is connected to your NAS via SMB3. To check this, in DSM, go to Resource Monitor > Connections. If it doesn’t say SMB3, you may need to contact Apple for further assistance.
- If possible, connect your Mac to your NAS via a wired network connection. If you can only connect via Wi-Fi, move it somewhere with a stronger Wi-Fi signal.
- Start up your Mac in safe mode and try backing up again. If this resolves the issue, remove any third-party software or contact the software vendor for assistance.
- Deactivate or uninstall any security or antivirus software. The following software have been shown to commonly cause issues:
- Bitdefender
- BullGuard Antivirus
- Cortex XDR
- Norton Security
- Sophos Home
- If your Mac isn’t using an Apple silicon processor, try backing up via AFP.
- If you have an external storage device, another Mac, or a Time Capsule device, try backing up to that device using Time Machine.1 If the backup still fails, there could be an issue with your Mac. Contact Apple Support for further assistance.
Collect logs and contact Synology
If the backup still fails even after checking all the items on your NAS and on your Mac, collect the following information and contact Synology Technical Support:
- Your macOS version
- The file service Time Machine used to back up (can be checked during backup at DSM Resource Monitor > Connections)
- A screenshot of the error message from Time Machine
- Time Machine logs on your Mac:
- On your Mac, launch Terminal.
- Start recording logs by entering the following command:
log stream --level debug --predicate 'subsystem == "com.apple.TimeMachine"' --style compact &> ~/Desktop/tm_debug.log - Back up using Time Machine again.
- Once the backup fails, go back to Terminal and press “Ctrl” + “C” to stop collecting logs.
- Enter the following command:
ps -ef > ~/Desktop/ps.log - (Optional) If the backup error says that there isn’t enough space on your Mac, enter the following commands one by one:
diskutil list &> ~/Desktop/disk_list.logdiskutil apfs list &> ~/Desktop/disk_apfs_list.logdiskutil info /System/Volumes/Data &> ~/Desktop/disk_info_Data.log - Then, you should have the following logs saved on the desktop:
- tm_debug.log
- ps.log
- disk_list.log (optional)
- disk_apfs_list.log (optional)
- disk_info_Data.log (optional)
- DSM system logs (DSM Support Center > Support Services > Generate Logs)
Notes:
- To back up to another Mac:
- On the destination Mac, turn on file and folder sharing.
- On the source Mac, connect to the folder on the destination Mac via its IP address
- In Time Machine settings, add the destination Mac as the backup disk.